Disclaimer: TideWe gave me this vest to do this review, and I earn from qualifying purchases using their links and code, thanks to them for their support.
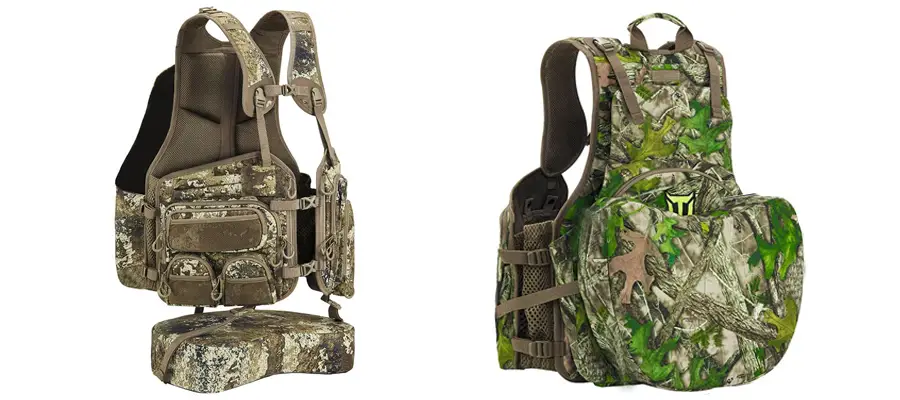
The new TideWe Turkey Hunting Vest with adjustable seat and game pouch is one of the best values in turkey hunting vests that I have seen. What you get for the money is really impressive. When my old turkey vest broke, I began the search for a replacement. I looked at some really expensive options and then came to TideWe and when I saw the price and the features, I felt I should give it a try.
Now having hunted spring gobblers with this vest, I am all the more certain that my initial impression was accurate. But being less expensive than the competition only matters if the gear is good. So, what makes this vest so good? In short, this thing is rugged, very strong, comfortable, has more pockets than anyone should ever need, and has a very sturdy seat that is the most comfortable of any vest I’ve used. This review goes in way more depth on all these points, but I have become a big fan of this turkey hunting vest, though I did not feel that way at the beginning. More on that in a moment.
The cost for the TideWe Turkey Hunting Vest shipped is usually about $90, but with the 18% off discount code TideWe gave me, you can get it for about $74. And sometimes it goes on sale for even cheaper than that. Just enter the code GK18 at checkout to get the extra discount.
How I Went From Hater To Fan In One Hunt
When I first got this vest I have to admit I was very disappointed. My old vest was very light weight, trim, sleek, and minimalist. When I tried the TideWe vest on in my living room it felt bulky, cumbersome, and I hated how the seat cushion deployed. I was so close to sending it back before ever using it. BUT I figured I had to try it in the woods first, after all it was not designed to excel in the living room, it was made for the woods.
So I loaded the vest up with my calls and gear and headed out on a big day of public land hunting. By the end of that first day my opinion on the turkey vest had totally changed. It didn’t feel bulky at all. The way the pockets were designed and how the material folded, provided no hinderance to me at all in the woods. In fact, after awhile I preferred it to my old vest in alot of ways.
In my old vest I could feel the box calls in the pockets jabbing into me, I could feel the range finder and strikers for the slate calls. This vest was thicker, had more substance, more material, better and smarter curves. Almost all of the gear was stowed without hindering me or reminding me every moment I was carrying it.
And this vest was rugged, I was not afraid to break brush with it, not concerned it might break like my weak old vest did. This thing was impressive. And after a few hours I got used to how the seat deployed and it didn’t bother me at all. I went from hater to fan in one hunt. This is why you should take unboxing videos and “reviews” with a grain of salt. If people haven’t hunted with a piece of gear, their opinion is only worth so much. For more information on turkey vests, check out my podcast episode: All About Turkey Vests.
Features
The TideWe Turkey Hunting Vest comes loaded with features, even more than the website advertises really.
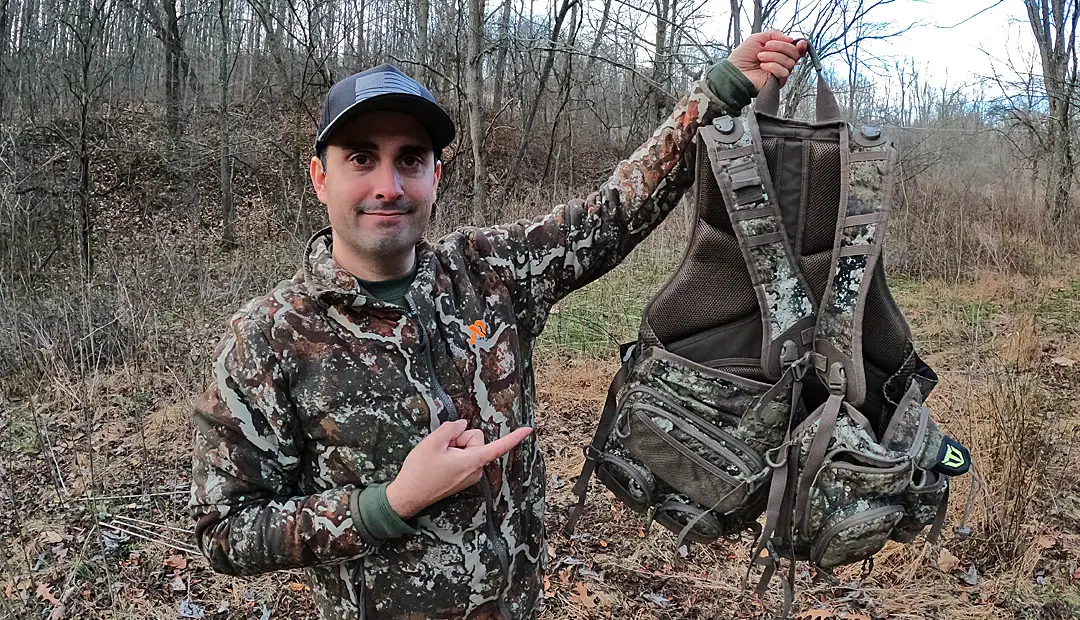
- The first thing you notice about this vest is that it’s strong, rugged, and well made. It is a turkey hunting vest that is made to be a workhorse.
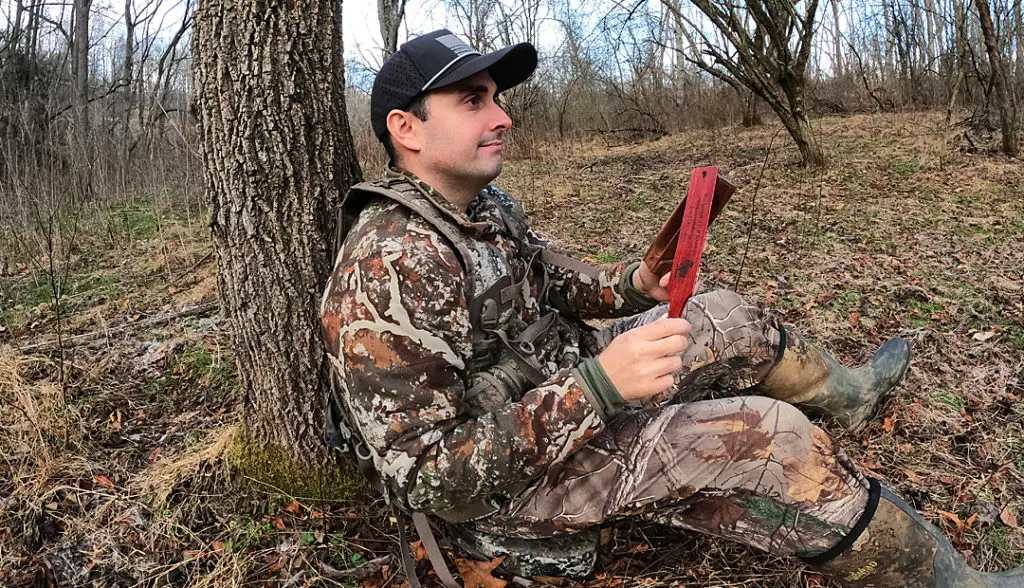
- The next big feature is the padding. There is very nice padding along the back, enabling you comfortably lean up against even the most knurled tree trunk.
- The back also has a nice breathable mesh which helps you from getting too sweaty on days when you are covering alot of ground.
- The seat cushion is very thick, sturdy, and comfortable. You really couldn’t ask for more in the seat, and one side is waterresistant and stiff while the other camouflaged and soft.
- The seat folds up and secures to the back of the vest via a strong magnet. This enables you to easily pull it loose and fold it down to sit on without having to look at it. You can easily get used to this, but one downside is the magnet is not as strong as I’d like and it can be a little challenging to secure it on the fly.
- Next you have the pockets, lots of pockets, somewhere around 12-15 pockets depending on what you count. There are pockets made for all your turkey hunting gear, box calls, slate calls, mouth calls, other calls, shells, phones, snacks, turkeys… you name it.
- There is a large game pouch in the back that will certainly fit a large gobbler. I am not a fan of putting turkeys in game pouches because I don’t want to damage the feathers, but I also do not hunt turkeys deep in the mountains either. The pouch might get more use if you used this vest hunting other game, more on that in a bit.
- There is also a large back pocket that gives you the space of a small backpack, but I wouldn’t put a lot back that if you plan to lean up against trees.
- There are two nice camo patterns, both look great, and overall the material is relatively quiet and the pockets that have zippers are fairly quiet as well.
TideWe really has been making some high-quality gear in recent years. Check out my TideWe See Through Hunting Blind Review, its great for turkey hunting as well, and my TideWe Hunting Range Finder Review.
How It Performs In The Woods
All the features in the world don’t matter unless the vest performs well. And this one really does. I have covered a lot of miles wearing this vest and spent a fair amount of time sitting in it too. I feel very comfortable and confident in it. Never do I have to worry about maybe breaking it. This thing can also carry way more gear and provisions than I could ever need, the storage capacity is off the charts for a turkey vest.
When I’m calling, I feel no restrictions, I can easily access my gear, its comfortable, and lets me hunt wherever and however I want. Honestly it does just about everything I want a turkey vest to do. If you paid more money for more expensive vests, you would get lighter, but less durable options, fancier pocket fastener technology to avoid more zippers, and perhaps more streamlined designs with fewer straps and clips but likely less adjustability. So more expensive options don’t gain you much, you have some trade offs, but nothing that is really going to help you take more turkeys. In the woods, this vest does its job and does it well.
Multi-Purpose Options
This is 100% designed as a turkey vest, but it can be a multi-purpose hunting piece. You can remove the seat to use this in a blind, either for turkeys or also waterfowl hunting. It would nicely for hunting squirrels or small birds. You can fit a lot of game in the pouch, and a lot of gear and ammo in the pockets. It could also be used for predator hunting, thanks to that nice seat giving you good dry comfortable options after hiking a long way.
I don’t think people take advantage of some of their gear, this vest can help you do a lot of things. This is durable enough to be used across many hunting seasons. I would encourage people to think outside of the box for numerous different hunting pursuits. They also make a version of this vest with a kick stand that enables you to sit upright even when there is nothing to lean up against. For some people, that version can help open up new hunting areas. But this one is better for me.
Pros & Cons
Pros
- Strong & Durable
- Very comfortable padding and seat cushion
- Adjustable and removable seat cushion
- Breathable
- Lots of pockets
- Quiet
- Well designed to fit big awkwardly shaped turkey calls
- Nice zipper extensions to aid those wearing gloves
- Game pouch
- Outstanding value
Cons
- A bit heavy
- The magnet that secures the seat could be stronger
- There are a lot of straps, clasps, and adjustments to figure out when you get it, and some straps dangle
- The seat storage and deployment technique takes a little practice to get used to
Conclusions & Recommendations
Overall the TideWe Turkey Hunting Vest is one of the best options on the market for new hunters and experienced hunters alike. I used to use a more expensive turkey vest, but I think this one is better. For the money, you get a very high-quality piece of gear with some features that even the more expensive brands cannot beat. Don’t forget to enter this 18% off discount code at checkout: GK18 to get the TideWe Turkey Hunting Vest even cheaper.
I have been very impressed with some of the gear that TideWe has been cranking out over the last couple of years. Again and again they put high quality items on the market for price points that are very hard to beat. And like many other pieces of gear from them, the great strength of this vest is the great combination of performance and value.
Be sure to listen to The New Hunters Guide Podcast and check us out on YouTube.
Till next time. God bless you, and go get em in the woods!
George Konetes Ph.D. – Founder and Host of the New Hunters Guide.
The New Hunters Guide is simply what George wishes he would have had when learning how to hunt; a single place to get practical hands on knowledge about different kinds of hunting, gear, strategy, and tips that can improve your comfort and fun factor in the woods.
As a note, TideWe gave me this vest at my request for testing, thanks to them for their support.